Categories
Cooking Techniques Creative Cookery

Get creative with cookie pie crusts

Graham cracker pie crust
By little blue hen (Flickr: unbaked graham cracker pie crust) [CC BY 2.0 (http://creativecommons.org/licenses/by/2.0)], via Wikimedia Commons
The traditional cookie-based pie crust is the graham cracker crust, which is essentially graham cracker crumbs and butter, sometimes with a bit of sugar and/or spice added in. (I usually leave out the sugar, because I don’t think I need the extra sweetness.) But you don’t really need to be limited to that.

You can make a wide variety of fun, tasty pie crusts from other types of cookies. The key is to choose crispy cookies, as soft cookies are more likely to create a soggy crust. Here are some suggestions:

  • Gingersnaps — great with pumpkin pie or vanilla custard filling
  • Chocolate cookies — great with chocolate fillings. Oreos can be used, but if you don’t remove the creaming filling, be sure to reduce the butter.
  • Vanilla Wafers — Toast them first so they are extra crispy
  • Oatmeal cookies — Be sure to use the crispy kind!
  • Shortbread cookies — A great subtle crust flavor
  • Pecan Sandies — This adds a touch of nuttiness to the shortbread cookie idea

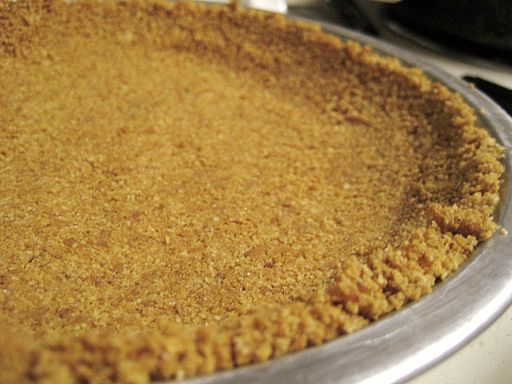
Ready to get creative with your crumb-y pie crust? Here’s a basic recipe:

1 1/2 cups finely ground cookie crumbs
6 tbsp melted butter

Mix together and press into your pie tin. Fill with your chosen filling! For some ideas on what to fill that pie crust with, grab a copy of Your Perfect Pie.

Categories
Cooking Techniques

Cheesecake Lessons Learned

Remember that Pistachio Cheesecake I shared with you last month? Here’s what it looked like the night of the big event, all gussied up with RediWhip:

pistachio cheesecake

 
Yeah, looks like a disaster, doesn’t it.

This is what happened.

I transported an opened can of RediWhip to the party. I didn’t think that would be a problem. But, as we were getting the can out of the car, you could hear a hissing sound. I think much of the gas that helps the whipped cream appear whipped escaped … the hissing went on for a good 5 minutes … and who know how long it was doing that before we opened the trunk!

So, lesson learned: Don’t open the RediWhip before you take it to a party or you’ll get liquid cream and not whipped cream.

Oh, well. It did taste good.

Categories
Cooking Techniques

Basic Cooking Terminology

boiling water
Public domain photo via pixabay.com
O.K. If you’re going to follow a recipe, you’re going to need to understand some basic cooking terminology. Many recipes use terms that have specific meanings. Many use abbreviations that you need to understand. (For example, a Tbsp. is much larger than a tsp. – I once made a batch of gingerbread men that turned into saltbread men because of my own confusion between these two.)

So let’s get to it!

Boiling
This means to bring any type of liquid to a boil. The boiling point is generally 212 degrees. Boiling is usually accomplished when bubbles have broken the surface of the liquid.

Bone
When you see this in a cookbook, it is generally telling you that you will need to remove any bones from the meat.

Braise
With this cooking technique, you brown the meat first and then place it in a pot with liquid. Then you tightly cover the pot and slowly cook the meat.

Categories
Cooking Techniques

Tips for Novice Cooks

a very novice cook!
Public Domain photo via pixabay.com
Everyone wants to be able to create wonderful meals, and, truly, it’s not rocket science. However, there are a few basic things that every novice cook should know in order to start creating culinary delights. So I thought I’d use the next few posts to cover some of them. Here are the first six.

1. Keep your cooking area clean.
A cluttered kitchen can lead to adding the wrong ingredients. Worse, if the kitchen is not clean, it could lead to disease. You should disinfect the counters and any other surfaces you’ll be using, such as cutting boards, before and after preparing a meal. This is especially true if you are cooking poultry or any type of raw meat.

Categories
Cooking Techniques

Cooking The Perfect Pasta

homemade ravioli
Photo Public Domain via pixabay.com
O.K. Last post I promised to finish the recipe. And then I took the week off — my back spasmed and I really needed to avoid the computer for a few days. Any, here is the rest of the recipe, along with some tips on cooking pasta. See! I’m giving you two posts in one!

Homemade Pasta, Part II
Using your hands, flatten the first ball of dough in your palm. You want the finished thickness to be roughly half an inch. If you are using a slot machine, you want to be sure that the width is the same size or smaller than the width of the pasta machine slot. When feeding the pasta machine, make sure you keep hold of your pasta, but avoid pulling it as it goes through the machine. You usually want the setting of the machine to be at a one.

Categories
Cooking Techniques

Bundt Cake Baking Tips

bundt cake
Ideenkoch via Photoxpress.com
Guest Writer: Leona H

Bundt cake recipes are cake recipes that use a “bundt” cake pan or a round baking pan that with a hole in the middle and ridged, decorated sides. Bundt cake recipes use a dense cake such as a butter or pound cake recipe. These cakes are sturdy and last well. Recipes often call for a simple glaze or fruit topping. The name Bundt comes from the German word bund, which means “a gathering of people.”

Bundt cake recipes have grown in popularity since 1966 when a “Tunnel of Fudge” cake recipe used a bundt pan to win second place at a Pillsbury sponsored baking contest. Bundt cake recipes have since been quite popular and bundt cake pan sales have increased.

Because bundt cakes are baked in these intricate pans, there can be mishaps when turning the pan upside down and separating the cake from the pan, ruining a wonderful cake. These mishaps can be avoided by following a few simple steps.

Categories
Cooking Techniques

Cutting Layers of a Cake

layer cake
Antonio Oquias via Photoxpress.com
Most of the time, when you find advice on cutting a layer cake horizontally to increase the number of layers, you’ll be told that you need a long serrated knife. And, it is always good to have one around. However, I’ve found that it is really hard to get a nice even slice through the cake that way.

Maybe it’s because I use too many strokes with the knife. The Food Network says that the fewer strokes you use, the smoother your layers will be. And suggests using toothpicks to help guide your cutting. Bon Apetit even suggests using a ruler as your guide!

However, I found a bit of advice that has worked like a charm and doesn’t require an elaborate set up of toothpicks. All you do is get some dental floss — yep, I said dental floss — and use it to slice through the cake. I recommend using one of the unflavored varieties, preferably unwaxed, so that you don’t add in extra, unwanted flavors to your cake.

How To Use Dental Floss to Slice a Cake Layer

Usually, I’ll create a guideline with a knife, maybe even start the cutting a bit in a few places. Then I’ll cut off a piece of dental floss that is long enough to wrap around the edge of the cake layer and a bit more to hold on to. I wrap the floss around the cake, making sure it fits nicely into the guide grooves I created, cross the ends and slowly pull it through. It’s kind of like you’re tying a knot and pulling it tight. This pulls the dental floss through the cake, cutting it into two layers.

Then all you have to do is separate the layers so you can add the filling. But that’s another post.

Want to see this idea in action? You can watch a demo of this technqiue on YouTube courtesy of Food & Wine.

The owner of this website has made a commitment to accessibility and inclusion, please report any problems that you encounter using the contact form on this website. This site uses the WP ADA Compliance Check plugin to enhance accessibility.