Categories
Cooking Techniques

3 Tips to Help You to Make Great Meals from Scratch

If you want to start making fantastic meals from scratch, you are not alone. So many people want to start cooking from home but if you are not an experienced cook, then you may have no idea where to start. This is completely normal but if you follow these three tips, you will start being able to make some really positive changes.

3 Tips to Help You to Make Great Meals from Scratch

Make Great Meals by Making a Plan from the Get-go

It’s important that you make sure you have a plan if you want to start cooking from scratch. At the end of the day, convenience foods are just so easy to access.

If you want to create a meal plan, then there are many ways for you to do this. You can easily plan for a week, or you can even plan for a month if you want. At the end of the day if you end up going back and forth when it comes to your plan, then this will work against you, and you may even find that you end up not being able to stick to a solid routine. If you have a plan, then you will be able to get your meat out of the freezer in advance, and after a long day, you won’t have to worry about what you’re going to cook. It’s already laid out for you.

Start Out Easy and Don’t Push Yourself Too Hard

If you have not cooked from scratch a lot, then it is important for you to start out easy. At the end of the day, there is absolutely no point in you trying to create gourmet meals if you have no experience. You also don’t have to make every meal from scratch either.

Make simple small goals and then work to achieve them. It may be that you want to make four dinners from scratch, or that you are going to start by making your breakfasts from scratch. Either way, you have to remember that you are the boss, and if you write down a goal, it is within your power to achieve it. If you struggle with meal planning remember that you can go through a grocery pick-up service to make things easier.

Use Good Recipes

Do your bit to try and write down a big list of meals that your family love. You then need to hang it on your fridge. Look out for meals that can be done in a hurry and that do not require a lot of ingredients. You also need to prepare yourself for any adjustments that may have to be made too. You have to remember that real food tastes far different from its store-bought, pre-made counterpart and that you may need to use spices or salt to make it taste more interesting. If you do this though, you will be able to broaden your understanding of food, and this can work in your favor overall.

Update Tried-and-True Recipes

Some of the best and most compelling recipes you might know probably come from your childhood: Your mother’s and grandmother’s recipes. However, while these comfort recipes are filled with delicious memories, they may not be suitable for today’s diet anymore. They are too fattening, too sweet, too calorie-heavy. They may not be allergy-friendly or suitable for people with food intolerances.

But, you can still make them work and adapt them to today’s diet with the tips of someone like Tamme McCauley if you are unsure on how to get started. There’s no need to look far to find good recipes. Most people already have those in their family! Alternatively, you can find plenty of inspiration on cooking blogs and shows.

Unleash Your Creativity with Experimentation

Feel free to experiment with the recipes I post on this blog!

Why not see if you could make a difference in your life today by following these tips?

Categories
Cooking Techniques

6 Ways Rookies Cook Steak Incorrectly

How do you like your steak cooked? Medium? Medium-rare? It’s not so bad when someone else asks you this question, but when you are the one doing the asking, the pressure is on. Steak is a type of meat that most people love, and serving it will definitely wow your guests. But it does need to be cooked correctly. Read on to discover some of the mistakes that you could be making when set out to cook steak.

Don’t be a rookie, use these 6 tips to cook the perfect steak every time.

  1. You sliced into it straight away.
    This is one of the biggest mistakes people make when cooking steak. It can be very tempting to cook your steak as soon as it leaves the pan so you can check it is the color you want it to be in the middle. However, if you do this, all of the flavourful juices will spill onto the plate, and the meat will be dry. You simply must leave it to rest for five minutes minimum.
  2. You don’t use a meat thermometer.
    The easiest way to tell whether a steak is cooked is to use a meat thermometer. Ideal temperatures are 165 °F for well done, 155 °F for medium, and 140 °F for medium-rare.
  3. You don’t let the pan get hot enough.
    In order to achieve the caramelized, crisp crust you want your steak to have, you need a cooking surface that is screaming hot. Nothing less will do.
  4. You don’t blot your steak before cooking it.
    Before you cook your steak, you need to take a paper towel and blot the meat dry on either side. The wetter your steak’s surface is, the more likely it will be to steam when you put it on the pan, which is never a good idea. Instead, get rid of the residual moisture beforehand so that your steak can get nice and crispy once it hits the pan.
  5. You don’t season your steak.
    Steak does not need a lot of dressing up. After all, it is delicious in its own right. However, it does need a bit of seasoning. Before cooking, you should sprinkle some fresh cracked pepper and salt on both sides of your steak. It is good to do this around thirty minutes before you intend to cook, as this will allow the seasoning to absorb into the steak.
  6. You bought the lean steak.
    There is a time and a place for cuts like chuck roast, or other lean cuts from your local butcher. They are great for casseroles and alike, but not good when you just want to eat a cut of steak on its own.

Are you guilty of making any of the errors that have been mentioned above? If so, take note of the tips that have been provided so that you get your steak right the next time you cook it. From seasoning in advance, to getting your pan hot, a few small changes can make a massive difference. Enjoy!

Categories
Cooking Techniques

How to Take Your Beef Steaks to Another Level

Steak. The king of meat. From the blue cheese smell of a raw, well-aged cut to the delectable, sweet, and smoky taste of a well-grilled chunk of beef, there’s nothing like it. But there’s nothing sadder than poorly cooked beef steaks. First of all, it’s a terrible waste of good food, and second, there’s no reason why you can’t have a steak like a professional chef.

How to Take Your Beef Steaks to Another Level

No matter where you go, a steak will taste different, and that’s because each chef has their own secret method of treating and cooking the steak. But in recent times, some chefs have become a little more open about some of the techniques involved in cooking a steak well. So, Heston Blumenthal’s blow torch technique aside, you should have no problem if you follow this advice.

Dry Beef Steaks Out

This might sound counterintuitive to getting a juicy steak, but the first secret to great beef steaks is actually allowing it to dry them out. If you have the room and you are serious about your meat, a dry aging cabinet is a beautiful appliance to treat your beef. However, for most of us, the fridge will work almost as well, as all you need is dry air.

When using the fridge, however, you will need steak that has already been aged. Cuts can be aged up to 120 days, but the average age of a good steak is 30 days. To dry your steak, simply lay it on a rack, season both sides with good quality salt, and leave it uncovered in the fridge for up to three days. This is known as dry brining. Dry brining allows the salt to penetrate the meat, but the dry exterior provides a great crust when cooked.

Butter, Butter, and More Butter

How do steakhouses get that unique taste on their steak? Butter. In particular, clarified butter. The reason for using clarified butter is that it has a higher smoking temperature than standard butter. Normal butter isn’t adequate for cooking steak recipes since searing at an extremely high temperature is necessary for cooking it properly.

Clarified butter adds lots and lots of flavor to your cut. The rich, nutty flavor associated with cooked butter permeates your meat when cooked in lashings of clarified butter. Additionally, clarified butter emulsifies on the meat and makes it shiny, helping with presentation. You can also use any butter left in the pan for a red wine deglaze.

Use the Oven

A critical method of cooking beef steaks is searing them in a pan. However, you shouldn’t be afraid to use your oven for cooking steak as well, especially with significant cuts such as a side of beef. Cuts like this are best seared in a pan and then placed in the oven to cook through. Searing won’t be enough, and if you try to cook a substantial cut this way, you will burn the outside with minimal cooking inside.

Other thick cuts such as sirloin, T-bone, and fillet mignon can also benefit from oven cooking. There are varying times for each amount of steak and numerous methods of cutting them following their cook. But generally sized steaks shouldn’t take longer than 10 minutes to get the center to 125 degrees, which is ideal for rare meat. Before serving a steak, always leave to rest for 5 minutes and slice against the grain.

Categories
Cooking Techniques

How to Boost Your Culinary Skills

Cooking is not an inborn skill. You learn how to cook through observation or training. The cooking process can be complicated, especially for someone who never had their parents teach them while they were young. Now that you’re an adult, you might feel embarrassed about your culinary skills, or worse, lack thereof. But no matter your skill level, there are ways to perfect your cooking. In this post, I share some simple techniques to help you master the basics of the culinary arts.

How to Boost Your Culinary Skills

Plan Ahead

As the adage goes, “failure to plan is planning to fail.” This also applies in the kitchen. Experimenting with a new recipe can be exciting, but the success of the process depends on how well prepared you are.

Don’t start blindly unless you want to disappoint yourself. Ensure you have all the necessary ingredients and read thoroughly through the whole recipe. You wouldn’t want to run to a grocery store in the middle of cooking.

If you’re experienced with a recipe before, you may want to deviate. However, a new recipe requires you to stick to every suggestion and detail, especially when you’re a beginner.

Perfect Your Culinary Skills with a Knife

Good food starts with a good knife. But you need to perfect your skills. Dicing a pepper or slicing onions in under 30 seconds is impressive, but it cannot make you a good cook.

What you need is to learn how to cut fruits, vegetables, and meat into the same shape and size. Uniformly chopped vegetables cook well and look presentable. If you chop the ingredients into different sizes, some pieces will get overcooked or undercooked, while others will come out burned.

Ensure you buy quality kitchen knives and learn how to sharpen them for an easy cooking process.

Have the Right Ingredients and Tools

A good meal is a product of the right ingredients cooked in the right appliances. Ensure your fridge and pantry are always stocked with various frozen or fresh vegetables, milk, spice options, and fruits.

Ensure you have the right appliances and tools like blenders, pans, and bowls. It’s also good to invest in equipment like a top wok for induction, classic serving spoons, and the right cooking pots.

Use Standard Recipes to Perfect Your Culinary Skills

The goal to is ensure you have delicious meals. After all, you’re not aiming to be an internal chef. So, follow the standard recipes in a cookbook. Learn and practice basic skills like cooking pasta, roasting a chicken, and sautéing vegetables.

This helps you build a strong cooking foundation. Once you’ve mastered these basic culinary skills, you may hone your craft with more advanced recipes and techniques.

Balance Your Flavors

Have you ever eaten a meal that’s too salty or too sweet? You may have the right ingredients and tools but end up with an unbalanced meal. Balancing flavors is an essential culinary skill you should learn.

Different dishes demand different amounts of salt. But if your meal calls for more salt, add to your own taste. You can toss in a splash of wine, lemon juice, or white vinegar for a tastier meal, as well.

The Bottom Line

These steps give you a foundation to boost your cooking skills. And as they say, practice makes perfect. Ensure you cook regularly to hone your culinary skills.

Categories
Cooking Techniques Ingredient Spotlight Special Occasions

Hot Dogs: A Guide for Cooking the Perfect Dogs at Your Next Barbecue

Hot dogs are an American classic and they are enjoyed throughout the world. No summer barbecue is complete without a round of delicious hot dogs, but so many people struggle to cook them properly.

There’s nothing more disappointing than a bad hot dog and they often end up being a bit lackluster because people don’t give them enough care and attention. If you throw some sausages on the barbecue and stick them in a bun with some mustard, you’ll have an average hot dog, but it could be so much better. This guide will help you make the perfect hot dogs every time, so your barbecue guests always leave happy.

Hot Dogs - A Guide for Cooking the Perfect Dogs at Your Next Barbecue

Cooking the Perfect Sausage

The first and most important step is obviously the sausage itself. It’s the star of the show and if you don’t get it right, you can’t just cover your mistakes with toppings. You could go for classic American hot dogs but a German Bratwurst makes for a much better hot dog. You could argue that it’s not technically a hot dog because you’re not using an American sausage, but you won’t have any complaints once people taste it.

People often struggle with bratwurst because they don’t know how to cook it. Knowing how long to grill brats on a gas grill is key, but you need to know how to prepare it first. If you throw them straight on the grill, the juices expand and they burst, so you lose a lot of the flavor. That’s why it’s best to parboil them first. You can do this in water or even in beer for extra flavor.

Once they are boiled, they are mostly cooked, so you just need to sear them on the grill for 4-5 minutes, making sure to get all sides.

Bread and Toppings Pefect the Hot Dogs

Now that you have the perfect sausage, you need to sandwich it in some delicious bread and add your toppings. Most of the time, people pick up hot dog rolls from the store and they’re fine. But the perfect hot dog deserves more than that, so you should consider making your own hot dog rolls. They’re simple to make and they taste so much better than store-bought ones.

When it comes to toppings, everybody has their own preference, so giving people plenty of choices is key. Make sure that you have all of the most popular hot dog toppings to hand, including mustard, ketchup, relish, and even some sauerkraut.

Sides

No hot dog is complete without some delicious sides to complement it. There are a lot of classic options like fries or coleslaw, but baked beans are often the biggest hit with hot dogs. They pair perfectly and they’re simple to make yourself. This is an easy side for a barbecue because you can just make a big pot ahead of time and let everybody dig in, leaving you free to focus on cooking your delicious hot dogs.

Next time you have a barbecue, follow these tips to make the perfect hot dogs and wow all of your guests.

Categories
Cooking Techniques

Roasting FAQ

November and December are big months for roasting. For the various holiday meals, both meats and vegetables are roasted for the feast. But what is roasting? And how does it differ from other ways of cooking in an oven? Read on to discover the answers to common questions about roasting.

Roasting FAQ

What is roasting?

Roasting is a low-maintenance cooking technique using dry heat. Hot air from the oven covers the food from all sides, cooking the food evenly. This is why roasting pans have a rack that lifts the food off the bottom of the pan so that the hot air can cook the bottom of the food. Depending on the food you’re preparing, you can slow roast at low, or more quickly with moderate or high temperatures.

According to Jessica Gavin, a certified culinary scientist and author of Easy Culinary Science, “Roasting food improves the texture of and deepens the flavor profile of what you’re cooking. It takes advantage of the natural sugars inside of food and gives them a sweeter, more concentrated taste.”

What is the difference between roasting and baking?

The terms roasting and baking are often used interchangeably, but they are subtly different. Roasting used to be done over an open flame, but more often than not, these days we roast in an oven. Here are the key differences between roasting and baking.

  • Food structure: You roast foods that are solid before you cook them. You bake foods that develop a solid structure during cooking. For example, you roast a chicken, but you bake a cake.
  • Temperature: Roasting usually uses a higher temperature (400°F and above) than baking (up to 375°F). This is because the higher temperature creates a browned, flavorful “crust” on the outside of the food.
  • Fat content: Roasted foods tend to have fat on the outer surface, whereas baked goods tend to have fat content throughout. For example, turkey has a fatty skin while muffins have fat throughout the batter.

One other difference, if you are baking meat or vegetable, it is usually covered, or at least doesn’t require turning over the food to cook the bottom. And, roasting is usually used on denser meats, such as beef, pork, and lamb, whereas softer or smaller cuts of meat, such as fish or chicken breasts are baked.

Of course, these are only guidelines. The two terms overlap quite a bit. “Some chefs distinguish between the two based on temperature,” says Danilo Alfaro of TheSpruceEats.com, “with roasting implying greater heat and thus faster and more pronounced browning than baking.” However, “Others may prefer to use the word ‘roasting’ specifically for meats, poultry, and vegetables, but use the term ‘baking’ for fish and other seafood.”

Is roasting the same as broiling?

No. When you are roasting, the heat comes from the bottom and the cooking process takes some time. Broiling is done quickly, with the heat coming from the top. The heat is also much higher with broiling.

Do you cover a roast in the oven?

In general, no. However, with smaller cuts of meat, you may need to cover it lightly with aluminum foil to prevent the meat from drying out. Basting is helpful at this point, as well, because it reintroduces the juices to the meat.

How do you roast meat?

Larger cuts of meat are ideal for roasting, whereas smaller cuts may dry out during the length of time it takes to roast. For example, the following taste great roasted:

[one_half]

  • Tenderloin (beef, lamb, or pork)
  • Ribeye (beef)
  • Tri-tip (beef)
  • Sirloin tip (beef)
  • Top Round (beef)
  • Shoulder (lamb or pork)

[/one_half]
[one_half_last]

  • Lamb Rack/Chop
  • Leg (lamb or pork)
  • Pork Side or belly
  • Pork Butt roast
  • Whole bird (chicken, turkey, duck)

[/one_half_last]

How do you roast vegetables?

Vegetables that are suitable for roasting are denser vegetables such as broccoli and Brussels sprouts, as well as root vegetables such as potatoes and carrots. Some softer vegetables, such as tomatoes, can be roasted at lower temperatures, as well.

The basic way to roast vegetables is to toss them in some olive oil or brush them will butter and place them on a baking sheet in the oven at 350 degrees F. Times will vary depending on the vegetable. About halfway through the time, the vegetables need to be turned over to ensure even roasting. Nuts and seeds can also be roasted in much the same way.

Rules of Thumb:

  • When roasting multiple vegetables, make sure they are approximately the same size and density so you avoid some being overcooked and other being undercooked.
  • When denser vegetables, such as potatoes and squash, are done, their skin should pierce easily with the tip of a sharp blade.
  • When green vegetables, such as broccoli and Brussels sprouts, are done they should look toasty and brown in parts.

How do you retain moisture when roasting?

One reason why you want to use large cuts or whole birds is to retain moisture during the roasting process. But there are other ways to assure that your dish is juicy and moist.

  • Basting: This technique is used with birds. Using a spoon or baster, you take the drippings and pour them over the top of the meat. Keep in mind, you must remove your dish from the oven and close the oven door. Do not baste the meat in the oven with the door open. This will cause the oven temperature to drop, adding to the cooking time, and increasing the risk of uneven cooking.
  • Marinating: Let the meat sit in a blend of oil, vinegar, and herbs for a few hours. This infuses the cut with both flavor and extra moisture.
  • Barding: You wrap the cut in something high in fat, such as bacon. It seals in the moisture and adds additional flavor.
  • Brining: In the past, this was a technique used to preserve food. Now, soaking food in a saltwater mixture is making a comeback because it imparts flavor and tenderness before cooking.

[one_sixth] [/one_sixth]
[five_sixth_last]

Do you have another question about roasting?

If your question about roasting was not answered in this post, please post it in a comment below. I’ll either answer it in a future post or update this one with the answer. [/five_sixth_last]

[divider]

[one_third] Healthy Eating Worksheet [/one_third]
[two_third_last]

Take Charge of Your Health!

Changing your eating habits can be tough. But it doesn’t have to be if you take a little time to think it out and create a plan.

This Healthy Eating Worksheet will walk you through the process of creating a healthy eating plan. All you need to do is print it out, set aside some time to complete it, and then fill it out. Then you can create your plan, knowing that you have addressed potential obstacles and came up with some creative ways to handle them.

Download Now [/two_third_last]

Categories
Cooking Techniques Creative Cookery Healthy Living Recipes

Making Homemade Salad Dressing is Easier Than You Think

May is National Salad Month … and what does every good salad need? Salad dressing! And, have you thought about making your own homemade salad dressing? Read on, it is easier than you think!

Making Homemade Salad Dressing is Easier Than You Think

salad dressing ingredients
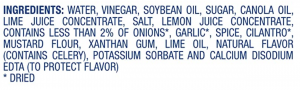
Go into any grocery store (at least once the COVID-19 pandemic is over) and you’ll usually find an aisle that almost dedicated to salad dressings. You’ll even find some in the refrigerated area of the produce section of the story. However, look at the ingredients of these convenient, pre-made dressings, and you’ll more than likely find within the top five ingredients some form of sugar.

Fresh salads and healthy lifestyles go hand in hand, right? After all, what could be better for you than a big plate full of leafy greens, fresh vegetables, fiber-rich legumes, and lean proteins? Unfortunately, you could end up negating these delicious and healthy choices if you aren’t careful about the type of salad dressing you use — as my little walk down the ingredient list just proved.

Taking a quick look at the list of ingredients on your favorite bottle of store-bought dressing can be a real eye-opener. In fact, in addition to sugar, you may be surprised to find a host of other ingredients you weren’t expecting, including high-fructose corn syrup and other sweeteners (alternative forms of sugar), trans fats, MSG, and an assortment of artificial colors and preservatives to make it all seem more fresh and natural.

Fortunately, making your own homemade salad dressing is faster and easier than you might think. Plus, you get to control how much you make at one time, so you don’t have to worry about throwing out your hard-earned money if you don’t use it all in time.

When it comes to homemade salad dressing, vinaigrettes are a fast, easy and delicious option. One general rule of thumb to keep in mind when creating your own vinaigrettes is to use 1 part vinegar (or another acidic ingredient, such as lemon juice) to 3 parts oil. In other words, if you use 1/4 cup vinegar, you’ll want to use 3/4 cup of oil. If you like a little more kick to your dressing, experiment with a 2:1 ratio instead.

When choosing these key ingredients, don’t be afraid to get creative. Think beyond plain white, red or cider vinegar and give rice vinegar, aged or white balsamic, red or white wine, or fruit-infused varieties a try, as well. Citrus juices, such as lemon, lime, oranges, and grapefruit, also work particularly well.

When it comes to choosing your oil, it’s hard to beat a high-quality extra virgin olive oil. However, you may also want to consider other healthy alternatives, such as a more delicate grape seed oil. Olive oils infused with garlic, rosemary or other herbs are also great choices. You can even experiment with sesame seed or avocado oil.

A third ingredient you may want to add to your vinaigrette is Dijon mustard. Dijon is a popular choice because it tastes great and helps bind all the other ingredients together.

Beyond these three ingredients, there are countless ways you can customize your vinaigrette recipes to complement your salad ingredients. For example, you can add minced garlic, onion, shallots, fresh or dried herbs, honey, or a variety of fruit juices or zests.

Here is a basic recipe to get you started:

Homemade Salad Dressing Ingredients

  • 3/4 cup olive oil
  • 1/4 cup balsamic vinegar
  • 2 tablespoons Dijon mustard
  • 2 teaspoons honey
  • 1-2 cloves finely minced garlic
  • salt and pepper, to taste

Homemade Salad Dressing Directions

  1. Combine all ingredients in a glass bowl or container with a tight-fitting lid.
  2. Mix or shake vigorously to combine thoroughly.

Starting with this basic recipe, I bet you can come up with dozens of yummy options to suit whatever salads are on your menu. Enjoy!

More Salad Resources

Lookup any recipe for a salad, and you’ll often find a recipe for a salad dressing to go with it. Guess what? You don’t have to use that dressing recipe only for that salad recipe! For example, the dressing recipe include with the Broccoli Slaw Salad on this blog can easily be used on other salads. So start experimenting and discover your favorite dressings that you can make at home.

[divider]

[one_third] Healthy Eating Worksheet [/one_third]
[two_third_last]

Take Charge of Your Health!

Changing your eating habits can be tough. But it doesn’t have to be if you take a little time to think it out and create a plan.

This Healthy Eating Worksheet will walk you through the process of creating a healthy eating plan. All you need to do is print it out, set aside some time to complete it, and then fill it out. Then you can create your plan, knowing that you have addressed potential obstacles and came up with some creative ways to handle them.

Download Now [/two_third_last]

The owner of this website has made a commitment to accessibility and inclusion, please report any problems that you encounter using the contact form on this website. This site uses the WP ADA Compliance Check plugin to enhance accessibility.