Categories
Cooking Techniques Creative Cookery Healthy Living Recipes

Making Homemade Salad Dressing is Easier Than You Think

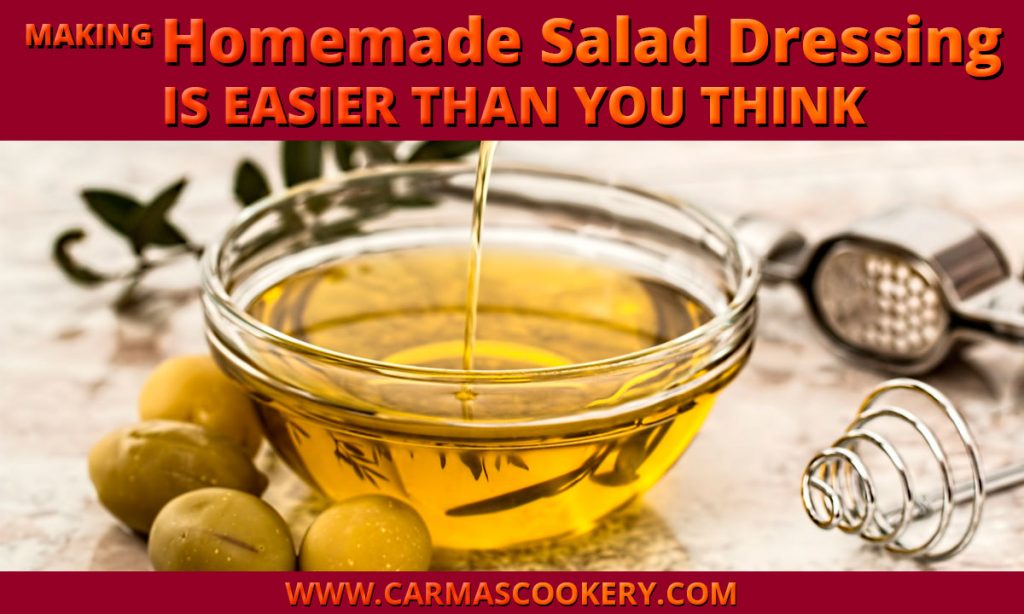
May is National Salad Month … and what does every good salad need? Salad dressing! And, have you thought about making your own homemade salad dressing? Read on, it is easier than you think!

Making Homemade Salad Dressing is Easier Than You Think

salad dressing ingredients
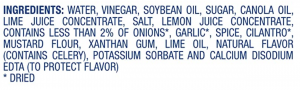
Go into any grocery store (at least once the COVID-19 pandemic is over) and you’ll usually find an aisle that almost dedicated to salad dressings. You’ll even find some in the refrigerated area of the produce section of the story. However, look at the ingredients of these convenient, pre-made dressings, and you’ll more than likely find within the top five ingredients some form of sugar.

Fresh salads and healthy lifestyles go hand in hand, right? After all, what could be better for you than a big plate full of leafy greens, fresh vegetables, fiber-rich legumes, and lean proteins? Unfortunately, you could end up negating these delicious and healthy choices if you aren’t careful about the type of salad dressing you use — as my little walk down the ingredient list just proved.

Taking a quick look at the list of ingredients on your favorite bottle of store-bought dressing can be a real eye-opener. In fact, in addition to sugar, you may be surprised to find a host of other ingredients you weren’t expecting, including high-fructose corn syrup and other sweeteners (alternative forms of sugar), trans fats, MSG, and an assortment of artificial colors and preservatives to make it all seem more fresh and natural.

Fortunately, making your own homemade salad dressing is faster and easier than you might think. Plus, you get to control how much you make at one time, so you don’t have to worry about throwing out your hard-earned money if you don’t use it all in time.

When it comes to homemade salad dressing, vinaigrettes are a fast, easy and delicious option. One general rule of thumb to keep in mind when creating your own vinaigrettes is to use 1 part vinegar (or another acidic ingredient, such as lemon juice) to 3 parts oil. In other words, if you use 1/4 cup vinegar, you’ll want to use 3/4 cup of oil. If you like a little more kick to your dressing, experiment with a 2:1 ratio instead.

When choosing these key ingredients, don’t be afraid to get creative. Think beyond plain white, red or cider vinegar and give rice vinegar, aged or white balsamic, red or white wine, or fruit-infused varieties a try, as well. Citrus juices, such as lemon, lime, oranges, and grapefruit, also work particularly well.

When it comes to choosing your oil, it’s hard to beat a high-quality extra virgin olive oil. However, you may also want to consider other healthy alternatives, such as a more delicate grape seed oil. Olive oils infused with garlic, rosemary or other herbs are also great choices. You can even experiment with sesame seed or avocado oil.

A third ingredient you may want to add to your vinaigrette is Dijon mustard. Dijon is a popular choice because it tastes great and helps bind all the other ingredients together.

Beyond these three ingredients, there are countless ways you can customize your vinaigrette recipes to complement your salad ingredients. For example, you can add minced garlic, onion, shallots, fresh or dried herbs, honey, or a variety of fruit juices or zests.

Here is a basic recipe to get you started:

Homemade Salad Dressing Ingredients

  • 3/4 cup olive oil
  • 1/4 cup balsamic vinegar
  • 2 tablespoons Dijon mustard
  • 2 teaspoons honey
  • 1-2 cloves finely minced garlic
  • salt and pepper, to taste

Homemade Salad Dressing Directions

  1. Combine all ingredients in a glass bowl or container with a tight-fitting lid.
  2. Mix or shake vigorously to combine thoroughly.

Starting with this basic recipe, I bet you can come up with dozens of yummy options to suit whatever salads are on your menu. Enjoy!

More Salad Resources

Lookup any recipe for a salad, and you’ll often find a recipe for a salad dressing to go with it. Guess what? You don’t have to use that dressing recipe only for that salad recipe! For example, the dressing recipe include with the Broccoli Slaw Salad on this blog can easily be used on other salads. So start experimenting and discover your favorite dressings that you can make at home.

[divider]

[one_third] Healthy Eating Worksheet [/one_third]
[two_third_last]

Take Charge of Your Health!

Changing your eating habits can be tough. But it doesn’t have to be if you take a little time to think it out and create a plan.

This Healthy Eating Worksheet will walk you through the process of creating a healthy eating plan. All you need to do is print it out, set aside some time to complete it, and then fill it out. Then you can create your plan, knowing that you have addressed potential obstacles and came up with some creative ways to handle them.

Download Now [/two_third_last]

Categories
Cookbook Reviews

Cookbook Review: “Taste of Tanzania” by Miriam Kinunda

Just before my third birthday, my family moved to Nairobi, Kenya. My memories start there and the two years I lived and attended school there have shaped much of my life. So, when the opportunity to review Miriam Kinunda’s cookbook Taste of Tanzania, nostalgia compelled me to say, “Yes!”

Cookbook Review: "Taste of Tanzania" by Miriam Kinunda

Summary of Taste of Tanzania

“I love to cook and entertain and have always served Tanzania dishes to my guests and friends,” said Kinunda (now Malaquias). “After receiving many requests for my recipes, I decided to start a website where they would be accessible to the masses.” And from there, Taste of Tanzania was developed.

The cookbook focuses on the cuisine of Tanzania, which shares a border with Kenya and Uganda on the East coast of Africa, along the Indian Ocean. This cuisine is influenced by Swahili (Bantu), Persian, Indian, and European cuisines. There is a wide variety of dishes from appetizers to main dishes to desserts.

What Worked for Me

I enjoyed the introduction, which included a lot of background information about Tanzanian cuisine, adding to what I already knew.

The photographs are homespun, which really lends a sense of authenticity to the cookbook. This isn’t some sleek, corporate book pushed out to make bucks. You can tell this was a labor of love.

The recipes look straight forward and easy to follow, and the author made an effort to translate authentic recipes into something that a cook in the U.S. could make.

What Didn’t Work for Me

The cookbook is printed on glossy paper, probably to make the photographs look better, but this also adds to the weight. It has quite a heft and increases the price of the book.

What I’d Love to See in the Second Edition

I would love to see an edition that was more wallet-friendly. There are some pretty amazing recipes in this book, but the $30+ price point makes it beyond what a lot of people may be willing to spend on cuisine with which they are unfamiliar.

Recommendation

If you enjoy exotic foods, full of flavor, then I suggest you give Taste of Tanzania a try. It was fun to peruse the book and remember the cuisines of my childhood. You might enjoy them, too.

Rating for Taste of Tanzania

[one_fifth] thumbs up [/one_fifth]

[one_fifth] thumbs up [/one_fifth]

[one_fifth] thumbs up [/one_fifth]

[one_fifth] thumbs down [/one_fifth]

[one_fifth_last] thumbs down [/one_fifth_last]

[one_half]

Specs

Full Title: Taste of Tanzania: Modern Swahili Recipes for the West
Author: Miriam R. Kinunda (she now goes by Miriam R. Malaquias)
Format: Hardcover, 192 pages
Publisher: Miroki Publishing
Language: English with touches of Bantu and others
ISBN-10: 0988735903
ISBN-13: 978-0988735903 [/one_half]
[one_half_last] Taste of Tanzania [/one_half_last]

Pick up your copy on Amazon.com here.

NOTE: I received a free copy of this book in exchange for an honest review. If you’ve read past book reviews, you’ll know that I don’t pull my punches when I believe they are warranted. I also try to provide balanced information so you can make your own decision to read or not read the book, even if you disagree with my opinion.

Categories
Ingredient Spotlight

Pork Chops: Cheap And Cheerful

I don’t know about you, but I think pork chops taste delicious — especially the way my husband makes them! That’s all fine and good, however, did you know that there are health benefits associated with eating this tasty meat? Many people do not realize that pork is actually good for you. Keeping that in mind, read on to discover some reasons why you should eat pork chops, and pick up some top tips on how to cook them as well.

Pork Chops: Cheap And Cheerful

What are the health benefits of chops?

  • High in protein: One of the best things about pork is that it is high in protein, which makes them great for metabolic renewal. In a three-ounce portion you can expect to consume roughly 24 grams of protein. This is important because protein is vital in relation to maintaining a strong immune system and it also helps with repairing your muscles after a workout.
  • Source of Zinc: In addition to this, pork is also a good source of zinc, an essential mineral. Its purpose is to aid reactions in your body. Therefore, if you do not have enough zinc it can actually lead to night blindness and a weakened immune system.
  • B Vitamins: The third and final reason why pork is a meat you should enjoy without feeling guilty is that it contains plenty of B vitamins. B vitamins are the precursors to neurotransmitters, the help form normal red blood cells, and they aid food metabolism.

Different ways to cook pork chops

I will often choose port chops at a restaurant, in part because no matter how hard I try I’ve never had much luck making them at home. Then my husband, who does not have much experience cooking, comes in and makes fantastically juicy and delicious pork chops. What was I doing wrong, that he was doing right? I dug a little bit deeper and learned some cooking methods that work well with pork chops.

  • Frying: Frying is a popular choice because it is quick and easy. It tastes good as well! All you need to do is heat a tablespoon of oil in a pan and then add your pork chop until it is cooked through. You can add a little bit of seasoning at the end to give more flavor. We have those cool copper nonstick pans, and my husband uses very little oil and a lot of onions to create his masterpiece (can you tell I love his pork chops?).
  • Baking: If frying isn’t for you, why not bake your pork chops instead? Preheat the oven to 350 degrees, season the meat and then bake in the oven until they are cooked.
  • Grilling: Grilling is the best option to go for if you are being health conscious. A lot of restaurants prefer this technique. All you need to do is take your grill pan out and make sure you turn the chop over when necessary so that both sides are cooked evenly.

So there you have it: the top three ways to enjoy tasty pork chops. Don’t forget to accompany your chops with some tasty side dishes. A lot of people love a nice dash of BBQ sauce with their chops. However, apple also complements pork beautifully, and thus you may wish to go for a salad containing this crunchy fruit. One thing is for sure, you are bound to enjoy!

Categories
Recipes

Easy Banana Bundt Cake

Want a quick, easy and deliciously moist Banana Bundt Cake? This recipe should fit the bill. The preparation time is less than 30 minutes and you can be doing other things while it bakes to perfection.

Easy Banana Bundt Cake

Ingredients for Easy Banana Bundt Cake

  • 1 box banana bread mix
  • 1 4-serving box of instant banana pudding mix
  • 4 eggs
  • 1 cup banana flavored yogurt
  • 1/2 cup vegetable oil
  • 1/2 cup water
  • 1/2 teaspoon vanilla extract

Directions for Easy Banana Bundt Cake

  1. Position rack in the center of the oven and preheat to 350 degrees.
  2. Grease and lightly dust the Bundt pan with flour.
  3. In a large bowl, combine ingredients in the following order: bread mix, pudding mix, eggs, yogurt, oil, water, and vanilla.
  4. Using an electric mixer, beat ingredients together for two minutes at medium speed.
  5. Pour the batter into the prepared pan.
  6. Bake in preheated oven for 70 minutes or until it springs back after being touched lightly in the center.

This cake tastes great served warm, especially will a scoop of vanilla bean ice cream!

Carma's Cookery Creative Cooking Tips

  • If you can’t find banana yogurt, you can substitute plain yogurt or sour cream. But so you don’t lose the banana flavor boost from the banana yogurt, substitute banana flavoring for the vanilla extract.
  • For a sweeter, more dessert-like cake, substitute banana cake mix for the banana bread mix.
  • If you want to make this even more banana-y, you can add one mashed ripe banana. However, you’ll need to bake it a little longer due to the increased moisture.

[divider]

[one_third] Bonkers for Bundt Cakes [/one_third]
[two_third_last]

Looking for a few more Bundt cake recipes to try?

If you don’t have a lot of time, but want a tasty Bundt cake, Bonkers for Bundt Cakes May just be the cookbook for you.

Filled with “made from cake mix” recipes, as well as a couple of from-scratch recipes, this simple cookbook is sure to please. Learn more and grab your copy at:

CarmasCookery.com/bundtcakes

[/two_third_last]

Categories
Cookbook Reviews

Cookbook Review: “Trap Kitchen” by Malachi Jenkins and Roberto Smith

“When two former members of Los Angeles’ most nefarious rival gangs decided to unite under one oven, they had no idea that they would be creating an empire.”
~ From the back cover of Trap Kitchen: Bangin’ Recipes from Compton

The Trap Kitchen, a restaurant with locations in Los Angeles and Portland, was founded in 2013, originally in Compton, Calif. Malachi “Chef Spank”, a Crip, partnered with his best-friend Roberto “Sous Chef News”, a Blood, with the goal of using food to change the path their lives were taking in the streets. Their business provides five-star restaurant meals without the five-star price.

Starting out as pop-up restaurants, The Trap Kitchen has grown in popularity, with celebrities and residents alike flocking to their locations. Trap Kitchen was inspired by this success.

Cookbook Review: "Trap Kitchen" by Malachi Jenkins and Roberto Smith

Summary of Trap Kitchen

This is the story of how two former gang members, from rival gangs, decided to change their lives by coming together and sharing food with their friends and the community. This book sports many urban dishes from their restaurants, but also a bit of their story.

What Worked for Me

This cookbook is full of personality. From typos that grow out of how they probably talk in real life to word choice in general. This is not a squeaky clean cookbook from Rachel Ray or Martha Stewart!

The photography and how it integrates with the overall design is beautiful. I very much enjoyed leafing through the book before reading it.

What Didn’t Work for Me

The cussing. My goodness, do they kiss their mommas with those mouths? I understand that cussing is part of their street cred, but I found it very jarring.

I also didn’t like how the recipes were displayed. You first got the instructions and had to turn the page to find the ingredients. This was made more confusing because the ingredients for the recipe on the page before ended up being next to the instructions for the next recipe.

What I’d Love to See in the Second Edition

If they do come out with a second edition, although I don’t see why they would, I’d rethink the recipe layout so that ingredients and instructions are more clearly together.

Recommendation

If you’re interested in street soul food and aren’t disturbed by bad grammar, bad language, and confusing layout, this is a lovely book to look at. In addition, some of the recipes look quite tasty, such as Byrd Gang (chicken rice), You Were My Cinnamon Apple (Apple Cinnamon Corn Bread), and Chicken & Waffles.

Rating for Trap Kitchen

[one_fifth] thumbs up [/one_fifth]

[one_fifth] thumbs up [/one_fifth]

[one_fifth] thumbs up [/one_fifth]

[one_fifth] thumbs down [/one_fifth]

[one_fifth_last] thumbs down [/one_fifth_last]

[one_half]

Specs

Full Title: Trap Kitchen: Bangin’ Recipes from Compton
Author: Malachi Jenkins and Roberto Smith with Marisa Mendez
Format: Paperback, 120 pages
Publisher: Vodka & Milk
Language: English (with explatives)
ISBN-10: 0997146265
ISBN-13: 978-0997146264 [/one_half]
[one_half_last] Trap Kitchen cover [/one_half_last]

Pick up your copy on Amazon.com here.

NOTE: I received a free copy of this book in exchange for an honest review. If you’ve read past book reviews, you’ll know that I don’t pull my punches when I believe they are warranted. I also try to provide balanced information so you can make your own decision to read or not read the book, even if you disagree with my opinion.

Categories
Product Reviews Tools of the Trade

Product Review: Bamboo Cheese Board by Royal Craft Wood

Bamboo has become an increasingly popular cutting surface for the kitchen. And there are a lot of benefits of using this material, which I will mention in this post. However, the main focus is the Bamboo Cheese Board by Royal Craft Wood, which I received today.

Product Review: Bamboo Cheese Board by Royal Craft Wood

Product Description: Bamboo Cheese Board

This bamboo cheese board can be used to spruce up your appetizer buffet, displaying cold cuts, cheeses or both. Because it is made of bamboo, it resists absorbing the odors of various foods, so your crackers won’t taste like gouda or prosciutto.

This particular design has a drawer with a four-piece stainless steel cutlery set inside, including a chisel knife, cheese fork, narrow-plane knife, and almond knife.

Why Bamboo?

Due to the hard density of bamboo, cutting boards made from this material are almost maintenance-free. Bamboo resists absorbing water and therefore will not warp or crack as easily as other woods. To keep your bamboo cheese board for years to come, simply follow these care recommendations:

  • Wash by hand — NOT in a dishwasher. The extreme heat can damage it.
  • Don’t let the board soak in water.
  • Wipe the board dry after washing by hand.

Also because of its hardness, bamboo resists knife scaring and therefore is less likely to have pockets where moisture, food particles, and bacteria can accumulate. This makes bamboo boards much more sanitary than boards made of other materials.

Because bamboo grows so readily, it is an easily sustainable and renewable resource. That makes products made out of bamboo more environmentally friendly.

What I Liked About Royal Craft Wood’s Bamboo Cheese Board

First off, it is the look of the board. This is a beautifully crafted cheese board that I will be proud to put on display for my guests. But it doesn’t end there.

I love the design, as well. That drawer with the cutlery set is ingenious. Until I saw this board, I had no idea cheese boards had such a feature. It makes is much easier to make sure that when you want the set, you can find it.

The quality is clearly there. The board has a certain amount of heft to it, so it feels durable. And, the little design details, such as the carved-in trays at either side for easily displaying small items (and keep them from falling off). The side handles — again carved in — make it easy to pick up off the table and carry. And the drawer is so seamlessly built-in, you wouldn’t know to look for it!

What I didn’t like about Royal Craft Wood’s Bamboo Cheese Board

This is nit-picky, but I really wish it came in some nice, protective packaging. It is such a lovely board, I would like to have said packaging around to keep it safe when not in use, and, since I’m in the middle of moving, it would make me feel more at ease that it won’t be damaged in transit.

Recommendation

If you would like a long-lasting, durable and versatile cutting board that you can tastefully display your meat and cheese appetizers on when you have company, this bamboo cheese board fits the bill. It has a lovely design, is well designed, and provides you with a handy cutlery set that is perfect for those types of occasions.

Rating for the Bamboo Cheese Board by Royal Craft Wood

[one_fifth] thumbs up [/one_fifth]

[one_fifth] thumbs up [/one_fifth]

[one_fifth] thumbs up [/one_fifth]

[one_fifth] thumbs up [/one_fifth]

[one_fifth_last] thumbs up [/one_fifth_last]

Bamboo Cheese Board

Pick up your board on Walmart.com here.

NOTE: I was reimbursed the cost of this cheese board in exchange for an honest review. If you’ve read past product reviews, you’ll know that I don’t pull my punches when I believe they are warranted. I also try to provide balanced information so you can make your own decision to read or not read the book, even if you disagree with my opinion.

Categories
Recipes

Single-Serve Sticky Buns

The historical ancestor of sticky buns was the bread with honey and nuts that the Ancient Egyptians ate. However, originally known as “Schnecken,” the German settlers of Pennsylvania (Pennsylvania Dutch) developed what we know today as the sticky bun.

The first people to add honey and nuts to their bread were the Ancient Egyptians. German settlers in Pennsylvania created our modern-day sticky buns.

At first glance, it can be hard to tell the difference between a sticky bun and a cinnamon roll — however, a difference does exist.

Cinnamon rolls are placed directly into a baking dish and glazed after baking. They also don’t contain nuts.

Sticky buns have a caramel glaze that is baked right with them. They also, more often than not, have nuts. In the case of the recipe below, I’ve used pecans.

This recipe makes 10 sticky buns. Cut this recipe in half and buy a smaller package of refrigerated biscuits to make a smaller batch.

Single Serve Sticky Buns

How to Make Single-Serve Sticky Buns

Ingredients

  • 2 Tbsp. butter cut into 10 equal parts
  • 1/2 cup chopped pecans, divided into 10 parts
  • 4 Tbsp. brown sugar, divided into 10 equal parts
  • 1 10-pack refrigerated biscuits

Directions

  1. Preheat oven to 375 degrees F.
  2. Using a 10-muffin muffin tin, drop one dollop of butter into each muffin hole.
  3. Sprinkle one portion of pecans and one portion of brown sugar over the butter.
  4. Top with one biscuit.
  5. Bake for 9 minutes or until golden brown.
  6. Place a large platter or cookie sheet on top of the muffin tin. Carefully flip the tin over. If necessary, tap the bottom of the muffin tin to release the sticky buns.
  7. Serve immediately.

Here are some storage guidelines in case you want to same some for later:

  • Room temperature: Up to 2 days. Cover with foil or plastic wrap to prevent drying out.
  • Refrigerated: Up to 7 days. Cover with foil or plastic wrap to prevent drying out.
  • Frozen: Up to 3 months. Simply thaw overnight in the refrigerator and warm up before enjoying them.
The owner of this website has made a commitment to accessibility and inclusion, please report any problems that you encounter using the contact form on this website. This site uses the WP ADA Compliance Check plugin to enhance accessibility.