Categories
Cooking Techniques Healthy Living Well Stocked Pantry

Freeze Favorite Comfort Foods: Tips for Home Cooks

With the increasing pace of modern life, frozen foods have become very popular and often take up more than two isles at your local grocery store. Look at the options, and you’ll find that most of them are versions of our favorite comfort foods. However, along with the convenience often comes a reduction in nutrition.

But it doesn’t have to be that way. Did you know that you can create home-made frozen comfort foods?

Freeze Favorite Comfort Foods: Tips for Home Cooks

When you freeze your pre-cooked comfort food, you can prepare it when you have time, freeze it, and then enjoy it when the time is right. Here are a few tips to help you do that.

Know What Not to Freeze

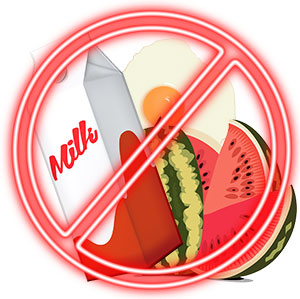
don't free theseBefore you freeze any of your home-cooked comfort foods, make sure you are aware of what you can and can not freeze. Let’s start with the foods that don’t freeze very well. This ensures you aren’t ruining ingredients that could have otherwise have been used for some tasty dishes.

For starters, you should never freeze plain cream-based ingredients, such as milk or sour cream, yogurt, or cottage cheese. These foodstuffs do not defrost well. This goes for cream-based soups, as well.

You also want to avoid certain fruits and vegetables, including citrus fruit, cucumbers, watermelon, and lettuce. Their high water content makes them bad candidates for freezing.

Cooked eggs and uncooked potato chunks also don’t freeze very well. If you want to freeze potatoes, they should either be raw or be mashed.

Learn How Long to Freeze Foods

The next important thing you need to know is the approximate storage time. Most things do have an expiration date even while in the freezer. While the food might not be spoiled, however, it will definitely decrease in quality and flavor if you go past the recommended times.

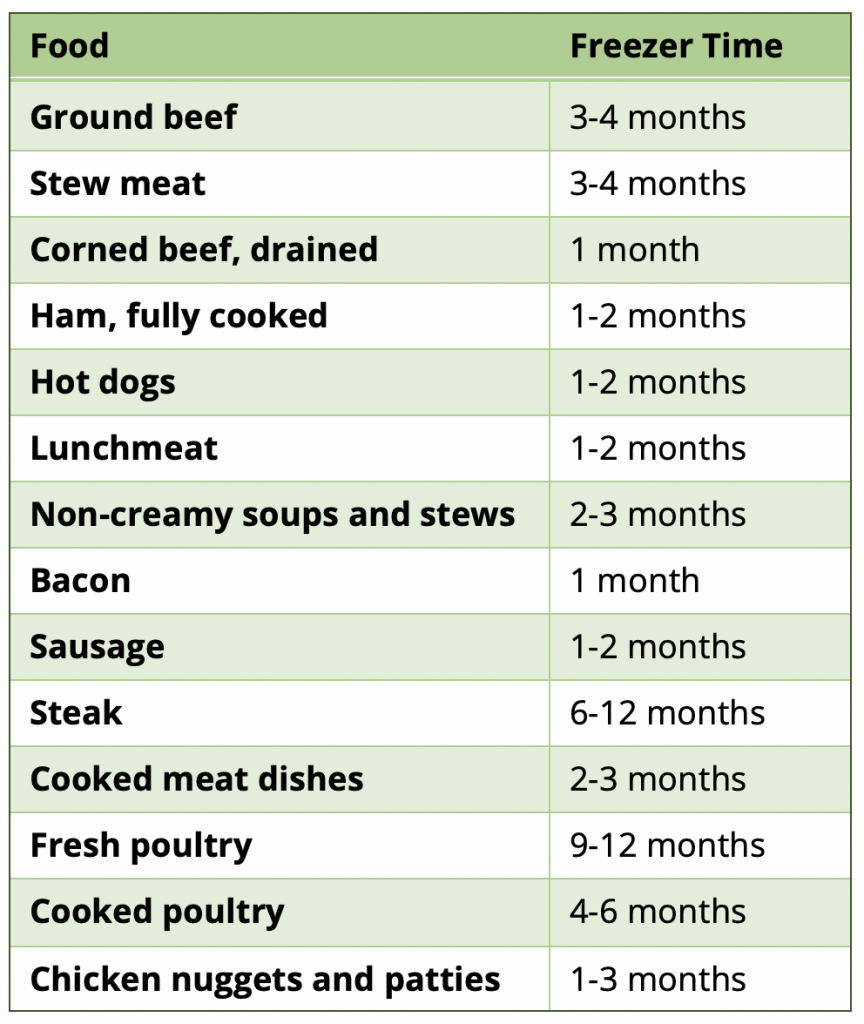
Food that tends to last the longest in the freezer is uncooked poultry and uncooked wild game, which should be fine for 9-12 months. After that, poultry parts, roast, steak, and other meat that is uncooked will freeze the longest, usually between 3 and 12 months, depending on what it is. Soup, stew, and casserole can be frozen for about 2-3 months. Luncheon meats, hot dogs, bacon, and ham can be frozen for about 1-2 months.

Here’s a handy freezer-time chart. Are your favorite comfort foods (or their ingredients) there?

freezer times

For more guidelines, download this refrigerator and freezer storage chart from the Food & Drug Administration.

Take Up as Little Space as Possible

If you are freezing a lot of foods and ingredients, you are going to take up too much space in your freezer and run out of room. A better idea is to try to stack freezer bags, which take up a lot less space, but can still be labeled and organized. For example, if you have soup or chili, let it cool off after cooking, then pour it in freezer plastic bags. Let them lay flat, then place them in the freezer. No matter what you store food in, make sure it is labeled not only with what the container contains but the date you froze it.

You can find freezer storage bags in your local grocery store. These bags are thicker than standard plastic bags and often come with space that is treated so that it is easier to write on. That said, I’d still recommend using a permanent marker. Not only will it write more easily on the bag’s surface, but it will also resist rubbing off.


[divider]

[one_third] Healthy Eating Worksheet [/one_third]
[two_third_last]

Take Charge of Your Health!

Changing your eating habits can be tough. But it doesn’t have to be if you take a little time to think it out and create a plan.

This Healthy Eating Worksheet will walk you through the process of creating a healthy eating plan. All you need to do is print it out, set aside some time to complete it, and then fill it out. Then you can create your plan, knowing that you have addressed potential obstacles and came up with some creative ways to handle them.

Download Now [/two_third_last]

Categories
Cooking Techniques

How to Salvage an Over-Baked Bundt Cake

O.K. It happens to us all. We’re experimenting with a new recipe… We get sidetracked by something else… We’re using an oven we haven’t used before… and our Bundt cake gets over baked. It’s not burned, but it is now kind of dry and the crust is a bit too brown.

What do you do? Throw it out?

No! You can salvage that partially O.K. Bundt cake by transforming it into another dessert. Here are a couple of ideas.

How to Salvage an Over-Baked Bundt Cake

Make a Trifle

You can cut off the over-brown crust and cube the salvageable inside. Then layer it with fruit and pudding in a trifle dish. Make sure that you don’t start or end with the cake cubes… that way you can make sure that the fruit and pudding are moistening it up from both sides.

Make a Mock Bread Pudding

Cut off the over-brown crusts and cube the salvageable inside. Toss the cubes into a 13 x 9-inch baking dish and pour some milk or soy milk over it… to just about 1/2 the height of your layer of cubes. That’ll be about 1 to 1-1/2 cups. Let that soak in the refrigerator for about an hour or so, until all the liquid is soaked up. You may have to stir the mixture up about half-way through.

Now take some instant pudding mix and follow the directions on the box. Just before it starts to thicken, pour it over the cake cubes. Mix until all the cubes are coated and/or soaked. Press down to even up the top. Put back into the refrigerator and let the pudding set.

Top with whipped topping and serve!

Of course, there are other ways you can salvage an over-dry Bundt cake… make fancy french toast, make a real bread pudding… let your imagination soar!

[divider]

[one_fourth] Bonkers for Bundt Cakes by Carma Spence [/one_fourth]
[three_fourth_last] Looking for a few more Bundt cake recipes to try? Don’t have a lot of time, but want a tasty Bundt cake? Bonkers for Bundt Cakes just may be the cookbook for you. Filled with “made from cake mix” recipes, as well as a couple from scratch, this simple cookbook is sure to please. Learn more and grab your copy at CarmasCookery.com/bundtcakes. [/three_fourth_last]

Categories
Cooking Techniques Flavor Blending

Soups: A Guide to Types (with Tips)

There is something comforting about a hot bowl of soup on a cold winter day. I guess that’s why January has been named National Soup Month. In honor of this occasion, I thought it was high time to provide a guide to soups, which come in a wide variety of styles. In this article, I will discuss some of the more common variations of soup and offer information and tips on preparing, serving and storing homemade soups.
Soups: A Guide to Types (with Tips)

What is soup?

The term “soup” refers to any type of liquid dish served in a bowl or cup. It is typically made by boiling vegetables, meat and/or fish in water or stock. It can also be made from fruit. I can be served warm or cold. It can be the first course of a meal, or it can be the entire meal.

A Brief History of Soup

There is evidence that soup was made as early as the neolithic age. And people have been making soup ever since. If there was meat available, it is highly likely that soup was made of it. In fact, around 6000 BC hippopotamus was the common mean found in soup!

Soup has also often been associated with bread. People would either dip bread into the soup, or soup would be poured over pieces of bread. A favorite way I like to serve chicken soup is over chunks of bread with mint leaves sprinkled over them. The combination of mint and chicken broth is surprisingly delicious.

Stock vs. Broth

Most soups start with a broth or stock as their base. But is there a difference between the two?

In many ways, the two are virtually interchangeable. The biggest difference between the two is that broth has seasoning in it and stock does not. There are also some differences in ingredients and cook time.

[one_half] Stock …

… is made by simmering a combination of animal bones (which typically contain some scraps of meat), mirepoix (a mixture of onions, carrots, and celery), and aromatics in water.

… is always involves bones, although not necessarily meat.

… is cooked for anywhere from 2 to 6 hours on the stovetop.

… has a liquidy consistency, even when chilled.

… is always left unseasoned.

… is typically used for sauces, gravies, braises, stews, and soups, etc. [/one_half]
[one_half_last] Broth …

… is any liquid that has had meat cooked in it.

… is made by simmering meat (which can contain bones, but does not have to), mirepoix, and aromatics in water for a relatively short amount of time, usually under 2 hours.

… is typically seasoned.

… is a thin, flavorful liquid that often gels when chilled.

… is used in all the same ways as stock, including soups, sauces, and braises.

… because it’s seasoned, can be favorable enough to be consumed on its own. [/one_half_last]

Bouillon is another word for broth. You can purchase bouillon cubes or powder at your local grocery store, which simply needs water added to make a broth.

Soup vs Stew

The biggest difference between soup and stew is how much liquid the dish has. Soups have more liquid and smaller pieces of meat and/or vegetable. Stews are heartier and have larger chunks of meat and/or vegetable. So, basically, stew is a heartier form of soup.

What are the different types of soup?

There are several kinds of soup that have their own, specific term. Here is a quick guide to soup types:

Bisque

A thick, smooth, rich, creamy soup that is highly seasoned and usually made from seafood. It is fo French origin and was classically based on strained crustacean broth. Newer recipes may use poultry or vegetables in place of seafood. At one time bisques were thickened with rice, but today they are more frequently thickened with roux.

Examples:

Bouillabaisse

A traditional Provençal fish stew originating from the port city of Marseille. It is highly seasoned and made of fish, shellfish, onions, tomatoes, white wine, olive oil, garlic, saffron, and herbs. Here is a recipe from Saveur.

Chowder

A thick, creamy and chunky soup or stew usually containing seafood, potatoes, and milk or cream. The word “chowder” comes from the French word “cauldron,” which means cooking kettle. Vegetables or fish stewed in a cauldron became known as chowder in English-speaking nations (a corruption of the name of the kettle in which the dish was cooked). The first chowders prepared on the North American continent were brought by French fishermen to Canada.

Clam chowder is the most commonly known, which has several varieties: Boston/New England Clam Chowder, which has a cream base, and Manhattan Clam Chowder, which has a tomato base, and Rhode Island Clam Chowder, which has a clear fish broth base. However, there are other types of chowder, as well. One of my favorites is Corn Chowder.

Consomme

A clear broth, of French origin, that has been clarified, a process that uses egg whites to remove fat and sediment. I can be served hot or as a cold jelly. Saveur has a good recipe for making this broth.

Court Bouillon

A stock made from wine, vegetables, and herbs, often including an onion studded with whole cloves. It is typically used to poach fish, seafood or vegetables.

Cream Soup

Much like a bisque, a cream soup is creamy. They are typically thickened using a white sauce, which at its most basic is a sauce made from butter, flour, and milk.

Gazpacho

Unlike most soups, gazpacho is not cooked. This Spanish soup is made from a pureed mixture of fresh tomatoes, sweet bell peppers, onions, celery, cucumber, bread crumbs, garlic, olive oil, vinegar and sometimes lemon juice. It is served cold, and may also be served “chunky-style.”

Gumbo

This American soup comes from the south and is a traditional Cajun/Creole delicacy of South Louisiana. Just like the culture that created it, it has multi-cultural influences: wild game or seafood (from the Acadians, descendants of French colonists), thickened with okra (from the Africans), file (sassafras powder from the Indians) and/or roux (from the French). Gumbo is a thick, robust soup with numerous variations including chicken and sausage gumbo, shrimp and okra gumbo, oyster gumbo and seafood gumbo.

Minestrone

A thick, Italian soup containing assorted vegetables, peas and beans, pasta (such as vermicelli or macaroni) and herbs in a meat or vegetable broth. You can easily make vegetarian or vegan varieties of this soup.

How to Remove Fat from Soup

Because many of the ingredients that go into making a good soup have a fair amount of fat or grease, you’ll need to remove excess fat. This makes for a tastier — and healthier — soup. You can remove fat during cooking or before serving. Here are some techniques you can use to remove fat:

  • Use a large spoon to skim the fat off soup as it simmers. I’ve found that metal or plastic spoons work better than wooden ones.
  • While cooking soup, place the pot slightly to one side of the burner. The off-centered bubbling will encourage fat to accumulate on one side of the pot for easier removal.
  • A leaf of lettuce dropped in a pot of soup will absorb grease from the top.
  • To remove the last spots of fat floating on the surface, drag a clean, unprinted paper towel across the top. It will soak up most of the remaining oil.
  • Refrigerate cooked stews and soups overnight before serving. The fat will rise and solidify in a layer at the top. The fat may then be removed by breaking it up into large pieces and lifting it away with a spoon.
  • When in a hurry to skim the fat from soup, float an ice cube in the soup to help congeal the fat and make it easier to remove.

How to fix overly salty soup

It can happen to anyone — you put a bit too much salt in your soup. How do you fix that without ruining the other flavors you’ve so carefully crafted? Try one of these methods:

  • Add a whole, peeled raw potato to the soup and simmer for 10 to 15 minutes. The potato will absorb the salt. Remove the potato before serving the soup. (There is no need to discard the potato — it is perfectly good for later use in another recipe.)
  • Stir in 1 teaspoon of vinegar and 1 teaspoon of brown sugar for each quart of liquid. This is not a good idea, however, if you are watching your sugar intake.

How to thicken soup

The best method of thickening most soups and stews is to remove some of the cooked vegetables, puree them in a blender, and return the pureed mixture to the soup. To prevent from getting burned by splashes of hot puree, don’t fill the blender more than one-third at a time. These two recipes use this technique to create a cream soup texture:

If your soup doesn’t have many — or any — vegetables, you can try one of these techniques:

  • Make a paste of all-purpose flour mixed with twice as much cold broth or water. The ratio of flour to liquid is 1-1/2 teaspoons of flour to 1 Tablespoon of liquid for every 1 cup of soup. Slowly stir the paste into simmering soup and continue to simmer for 5 to 10 minutes.
  • A roux of butter and flour may also be used as a thickener (much like a white sauce). The longer the roux is cooked, the darker and more flavorful it becomes. Be careful not to scorch the roux or it will give the soup an unpleasant burned taste.
  • Cream or half-and-half is another way to not only thicken but also add a sumptuous richness to your soup.
  • A slurry made from 1 part cornstarch to 2 parts liquid will also thicken soup. Do not boil, or the solution will break down.

Freezing and Reheating Soup

Most soups freeze beautifully, so you can prepare a large batch and freeze to serve at a later date. Here are some basic steps for freezing and reheating soup:

  • Chill soup in the refrigerator and skim off any fat that rises to the surface before freezing.
  • Freezing cream-based soups may cause separation. If the soup does separate while reheating, whisk vigorously with a wire whisk or try blending it in a blender for a few minutes to smooth it out.
  • Reheat frozen soups in the microwave or thaw at room temperature and heat in a heavy saucepan over low heat on the stovetop.
  • To avoid overcooking starchy ingredients like potatoes, pasta, and rice, heat thawed soup only long enough to warm throughout.

More Soup Making Tips and Facts

Tips for serving soup

  • A quart of soup will make six side dishes, or two main dishes.
  • A hot soup will help recondition the palate between meal courses or after consumption of alcoholic beverages, so plan when you serve it accordingly.

Notes on cold soups

  • Ideally, cold soups should be served in chilled dishes.
  • Adjust seasonings of cold soups just before serving. Chilled foods tend to dull the taste buds and will require more seasoning than hot soups.

Tips for flavor

  • Be aware that herbs will have a more intense flavor if added at the end of the long cooking process.
  • Savory soups and stews always taste better if made a day or two in advance, refrigerated and then reheated just prior to serving.
  • Wine is a wonderful flavor addition to soups and stews. When using wine in soup, use less salt as the wine tends to intensify saltiness. Wine should be added at a ratio of no more than 1/4 cup of wine to 1 quart of soup.
  • Beer is also a good addition to soups and stews. A good rule of thumb is 1 cup of beer to 3 cups of soup.
  • Freeze the liquids drained from canned mushrooms or vegetables for later use in soups or stews.

Cooking Tips

  • Since liquids boil at a lower temperature at high altitudes, cooking time may need to be extended at altitudes above 2500 feet.
  • Soups and stews should only simmer while cooking, never brought to a hard boil.

Final Comments About Soup

As with most dishes, the best soups are made with a base of homemade broth and fresh ingredients, however, this can be very time-consuming and labor-intensive. If you wish, time spent in the kitchen preparing soup may be reduced by using canned or frozen broths and vegetables while still yielding an excellent result.

Remember: There are no really good quick soup recipes because any truly good soup needs time during preparation for the flavor to fully develop. Always plan on providing enough time to prepare a really good soup or stew.

[divider]

References:

  • Wikipedia
  • The Dictionairy
  • A 2005 article by Janice Faulk Duplantis

[divider]

[one_fifth] Superfood Soups [/one_fifth]

[four_fifth_last]

Want to make healthier soups?

Making sure your home-made soups have superfoods in them can really give a boost to their nutritional value. Download your copy of Superfood Soups today!

Learn More | Buy Now [/four_fifth_last]

Categories
Cooking Techniques Creative Cookery Flavor Blending

A Meat Lovers Heaven

Are you one of the meat lovers? When it comes to eating meat, you’re either really into all the different types of meat, or you really don’t care one way or the other. The world is divided as to how much meat we should be eating, and if we should be eating any at all. But all of these conspiracy theories created by people who love to shake the world, should not distract you away from the benefits of meat.

I admit, eating it in large quantities is not going to do your digestive system any good. But meat is something you’re most likely only going to eat once a day, in your evening meal. When you do, you’re getting so much protein and vitamins and minerals, that it would be a shame to give it all up. And some people have to eat meat or they’ll get sick!

But for those of you who are serious meat lovers, giving up is just not on the agenda. Eating meat is life, and the flavors it creates, and the texture it adds to a dish, just can’t be replicated. This article is dedicated to those of you who know you just can’t live without your meat fix. I’m going to show you the different ways you can step up your meat game.

Countries around the world have taken cooling meat to the next level, and simply sticking it in the pan and waiting for it not to be raw is not an option anymore. So if you’re ready to step up your game, sit back and relax, and see what you think of these ideas.

A Meat Lovers Heaven

Different Ways of Cooking Meat

Let’s start off with the most important part. So many of people are missing out on beautiful tasting meat, simply because they stick to cooking it in the pan with just a little bit of olive oil or butter to make sure that it doesn’t stick. But this is most definitely not the way you should be cooking your meat, especially if you’re always looking for the finest tasting option.

True meat lovers own a smoker. Smoking meats is what so many big chain restaurants do in the U.S., and what nearly all of the smaller family businesses use. It’s literally the secret key–that’s not so secret–however, many people just don’t implement this cooking method.

You can get little smokers that can sit in your garden while your meat is slowly smoke-cooked. This type of cooking method is the best with brisket and steaks, simply because it produces that deep smokey flavor while leaving the meat so tender and juicy. You’d have to do your research as to how long to cook each meat, but generally, you’ll have to learn by trial and error. This is a super good, long term investment, and I promise you won’t regret it if you give it a go for the summer!

Different Meats To Try

If you call yourself a meat lover, I have this question for you: How often do you venture outside the common two? The two types of meat that most people seem to eat are chicken and beef. Pork seems to be the meat left out of the picture so often, but it’s one of the most flavorsome meats when you cook it right. But this is the part that so many people get wrong, including myself. How many times have I made pork and ended up with a dry lump of meat? I’ve lost count. My husband, on the other hand, makes an awesome pork steak that is juicy and flavorful! Go figure.

The problem with cooking port often starts with the cut. If you don’t get a good cut of meat, it won’t come out right. So first of all, think about sourcing something such as brine pork ribs. Ribs are massively underestimated, but when seen on a menu in a restaurant, soon they get the standing ovation they deserve.

However, at home, it’s just not common to see pork ribs. Here’s the scoop: This dish starts in the morning. Get a big enough dish, and coat the ribs in your favorite BBQ sauce. Go a bit fancy, and source one that you know restaurants use. Leave it to soak all day, and then slow roast them in the oven in the evening. That strong BBQ flavor, alongside juicy slow-cooked meat, is a winning combination. Have a side dish of beans, corn on the cob, and maybe a few chips or fries, and you’ve got yourself a succulent meat dish we know you’ve been sleeping on!

The Best Country for Meat Lovers

If you really love meat, then you should definitely think about going on a little meat lovers adventure around the States. So many restaurants serve the craziest meats, cooked to perfection. Just going there simply to eat food is enough, but you’re all aware of the super cool things you could do alongside that. So do your research, and find out what states are the best for well-cooked meats!

And don’t stick to the obvious, sit-down restaurants either. Some of the best pulled pork I’ve ever had was cooked in a smoker in the parking lot of an Ollie’s in Maryland.

Categories
Cooking Techniques

Tips on Tenderizing Meat

Mastering the skill of tenderizing meat can mean the difference between an enjoyable meal and a tough-to-chew hunk of meat. From wagyu beef to pork loin, the best cuts of meat are those that have been tenderized. If you go to any of the best restaurants and order a meat dish it will be easy to chew and full of flavor because they make the effort to tenderize the meat.

However, this is not always the case when you purchase inexpensive cuts from supermarkets, which is why it is important to tenderize the meat. The same goes for when it comes to meal kits. Read meal kit reviews to ensure the meat provided is tenderized, if indeed included. If not, it’s your job to do this! Let’s take a look at the different ways you can do this…

Tips On Tenderizing Meat

Tenderizing Meat with Enzymes

The first method involves using foods that contain enzymes that will break down the muscle tissue in the meat. This includes enzyme-rich foods, such as kiwi, pineapple and ginger, as well as acidic foods, for example, wine, yogurt and vinegar, and also citrus fruits, like limes and lemons.

If you follow this approach you will need to create a marinade, using either one or several of the ingredients that have been mentioned. You should then marinate the meat for anything from two to 24 hours, depending on the strength of the marinade. Another option is to purchase a meat tenderizer to sprinkle on top. These tend to be enzyme based and therefore they have a similar effect.

Of course, be careful with this technique. I once cooked chicken in a pineapple and when I pulled the dish out of the oven, the chicken was mush!

Tenderize Your Meat with Muscle

If you don’t want to follow this process, then you could tenderize the meat by pounding it instead. This works really well with skirt steak, round steak, and flank steak. You should begin by getting rid of the excess fat. Don’t cut it all off, as you will need to leave some for flavor. Once you have done this, pop the meat in the freezer for approximately half an hour. You don’t want the meat to freeze, but you want it to get cold.

After half an hour has passed, take the meat out of the freezer and place it on a chopping board. This is vital to protect your kitchen counter. The last thing you want is to whack your worktop with a steel mallet. Now you can use the mallet to tenderize the meat. Simply pound the meat on both sides until it is nice and tender. This approach is effective because it breaks down the fibers, which will make it much easier to chew.

Tenderizing meat is one of the most important processes for cooking steak effectively, empowering you to enjoy the best, most flavorful meat. These two processes mentioned above are highly effective and you will immediately notice the difference if you do not usually tenderize meat before cooking it.

Categories
Cooking Techniques Tools of the Trade

How To Use an Apple Peeler-Corer

I may not use it all that often, but I love my apple peeler/corer. It may take a little getting used to — there are peculiarities to this gadget. But once you get the hang of it, you can cut your apple peeling and slicing chores in half — if not more. In addition, your apple slices will be more uniform and, possibly, thinner than you could achieve with a knife. If you make apple pie at least once a year, you’ll want to have one of these on hand. In this post and its accompanying video, I show you how to use one.

How to Use an Apple Peeler Corer

What Is an Apple Peeler/Corer?

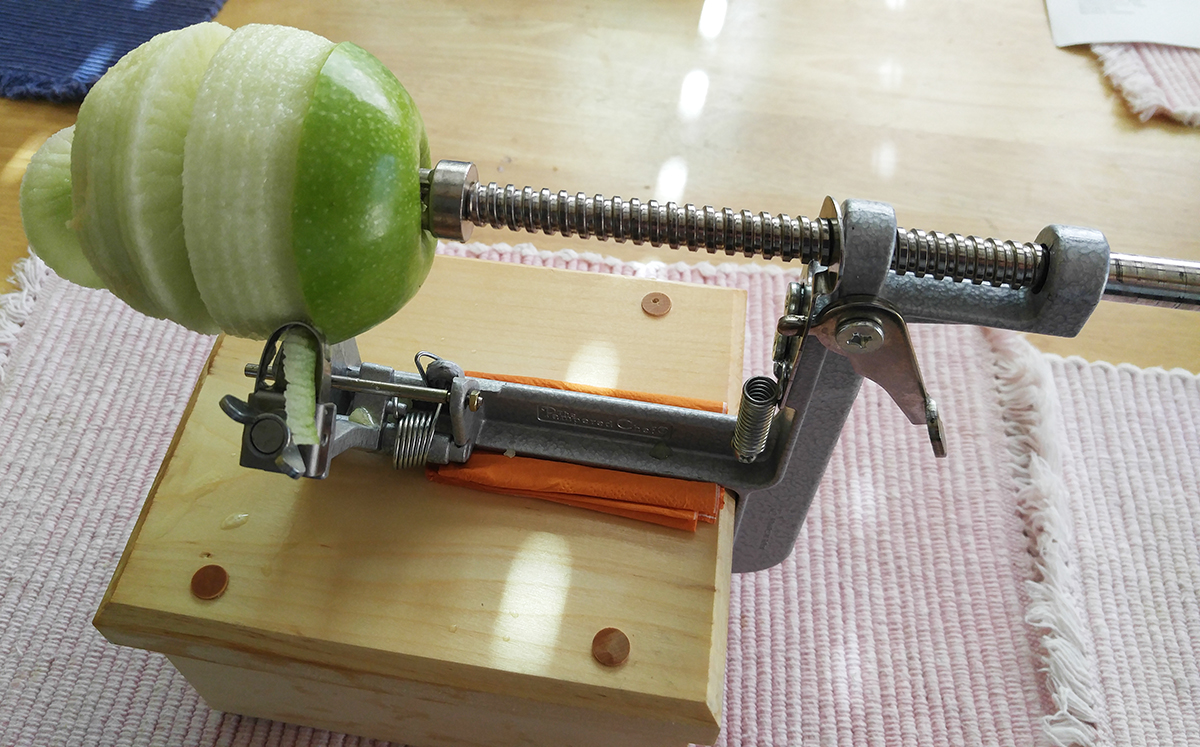
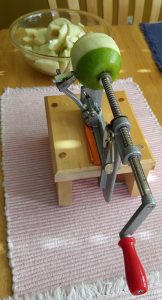
Pampered Chef apple peeler and corerApple peelers, once called apply parers, are gadgets that peel, slice, and core apples, making this time-consuming kitchen task much quicker and easier.

Most models of apple peeler, slicer, and corer are mechanical in nature, using a crank to push the apple through the device. However, electronic versions also exist.

They first came into demand as early as the 1700s when a growing need for apples as a winter staple for both food and drink became apparent. In order to store this fruit, they needed to be processed and peeling, coring and slicing by hand were cumbersome, slow and, in some cases, wasteful. Therefore inventors started creating a variety of gadgets that would get the job done.

You can learn more about the history of apple peelers at The Virtual Apple Parer Museum and at the Museum of the City of New York.

Varieties of Apple Peeler and Corers

apple peelerApple slicers come in two basic types: One that simply removes the core and slices the apple into eight slices, and one that peels, cores and slices to whatever width you choose. In this post, I’m talking about the latter. The one I have is from The Pampered Chef, which I mount upon their apple peeler stand. You can purchase them separately, or as a set. However other companies make these kitchen gadgets, as well.


How To Use an Apple Peeler-Corer

In this video, I show you how I use my Pampered Chef Apple Peeler-Corer.

close up of Pampered Chef apple peeler and corerStep 1: Mount the peeler to a stand or other fairly stable surface.

Step 2: Choose a firm apple. If there are bruises, it will be more difficult to peel.

Step 3: Place the apple in your peeler. Try to get the two ends of the core as straight as possible so that the three prongs go in the side where the stem was and the coring circle will meet the other end and evenly as possible.

Pampered Chef apple peeler and corerStep 4: Turn the crank so that the apple moves toward the coring circle. I didn’t mention this in the video, but the peeler can be set at different depths so you can get a thinner or thicker slice of the peel. Be sure that it isn’t so thin that much of the peel remains on the apple, or so thick that you waste a lot of the actual fruit.

Step 5: Once the apple is through the coring circle, simply remove your spiral-cut apple and cut at least on one side to create slices.

Step 6: Remove the skin that was peeled off and the core from your apple peeler and you are ready for your next apple.

This Thanksgiving I made two Johnny Appleseed Pies (it’s my husband’s favorite pie). I’ll share the recipe, along with some creative alteration ideas tomorrow.

Categories
Cooking Techniques

A Delicious Asian Food Feast, Home Cooked In 5 Easy Steps

Have you ever gotten take out Asian food and thought, I bet I could do this at home? Well, now you can! And it’s not even that complicated. You just need to know the inside tricks to help you. Luckily, below you will find some of these, along with a step-by-step guide on how to create a delicious home cooked Chinese feast that includes tempura vegetables, special fried rice, and Chinese pork. Yum!

fried rice
Image link

Step One: Prepare Before You Cook

The first step is to get as much as you can ready before you start cooking. That means boiling the rice, dicing the vegetables and marinating the pork.

You can use boil in-the-bag rice as it’s way easier and always come out good. Set this to boil while you cut up bell peppers, onions, and sweet potatoes for the tempera. When this is done dice some more onions and microwave some frozen peas for the rice.

Then take your pork steaks and make a marinade from soy sauce, crushed garlic, ginger and fresh chili, as well as Chinese five spice, and rice wine vinegar. You can do this according to your taste or follow an exact recipe here. You can even throw in some duck sauce for a rich, sweet kick that goes great with the pork. Once it’s made thoroughly toss the pork in this.

Step Two: Cooking Chinese Food Ingredients

This is where you start cooking for real, so pop the pork into an ovenproof dish, and then into a preheated oven at 400 degrees F for about 20 minutes.

Remove the peas and onions from the microwave and set aside. Take an egg and make a thin omelet in the base of a wok or frying pan. Then turn this out on a cutting board and dice it into smaller pieces and leave to cool.

Step three: Deep Fry the Tempura

Create a simple batter for the tempura with flour and water. A carbonated and fruit flavored water can give the batter a delicious light texture, and slightly sweet taste that is perfect for this recipe. Get the exact measurements for a perfect batter here.

Then dredge the pepper, onion, and sweet potato pieces in flour, dip in the batter and deep fry in hot oil until crisp. Remove the from the oil and set aside on kitchen roll to allow them to drain.

Step Four: Prepare the Fried Rice

At this point, add some sesame oil to a wok or frying pan. Toss in the peas and onions. Drain the rice and add to the wok. Stir fry on a high heat for a minute or two. Adding the egg just before the end so it can heat through. Just before you serve, get the pork out the oven and make sure it’s cooked.

Step Five: Serve Your Asian Food Feast

Lastly, serve up your delicious items in separate bowls and allow your guests to help themselves. A sweet chili sauce is a great accompaniment to the tempura, and some extra soy can give the rice a nice tang. Make sure to set out both chopsticks (for that authentic experience) and forks and spoons (for your less adventurous diners).


Save

The owner of this website has made a commitment to accessibility and inclusion, please report any problems that you encounter using the contact form on this website. This site uses the WP ADA Compliance Check plugin to enhance accessibility.